Construction Project: Casa "La Esperanza"
Stage 1 - Boundary Wall
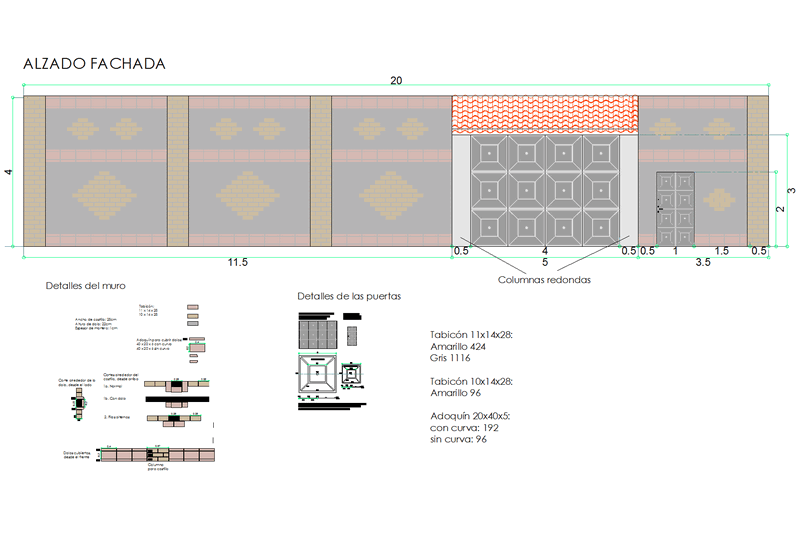
This page deals with phase 1 of the construction, comprising boundary wall with fachada, septic tank by the front-left corner, and storage room built over the septic tank. This relatively straightforward work was unfortunately entrusted to "maestro" X. We thought he would know how to build something as basic as a wall; we had not seen the details of this in the permission document, since the alcoholic topographer retained it. We had expected from what "maestro" X told us that he would prove capable enough - but as you will see, he turned out to be about as much use as a chocolate fireguard...
The total time taken for the work on this page is over 13 weeks, after which the boundary wall was nowhere near finished. Click here to see a summary of masonry costs for this stage.
Page Contents
- Week 1
- Trenches are dug, and some rocks, concrete and castillos placed. But positioning inconsistencies are already apparent.
- Week 2
- All rocks, concrete and castillos have been placed, except by the neighbor's wall. "Maestro" X has paid no attention whatever to the required position of the portón; all the castillos have been placed in arbitary (unequal) positions.
- Week 3
- Foundation walls and dala de desplante partly done, but the reinforcements were inappropriately cut off rather than using single lengths to reach the top of the wall. Also pointless and stupid was a delivery of revuelto.
- Week 4
- The septic tank was built with pipes incorrectly placed, then remedied. And we doubt the base is reinforced as required.
- Week 5
- Walls and storage room are underway but gross errors are now apparent, in both the storage room and the fachada wall (in addition to previous mispositioning of castillos).
- Week 6
- Misalignment in fachada solved by using a different size of block - but of the wrong color, thus spoiling the design. "Maestro" X confirmed that he does not take plans seriously when we showed him the house plans, by laughing and immediately putting them to one side.
- Week 7
- More pointless deliveries of revuelto, an inadequate zapata revealed, and the dreadful-looking fachada is made even worse by mortar color being changed from brilliant white to battleship gray.
- Week 8
- The storage room is more or less complete with losa, but there are cracks in the wall that reflect excessive distance between castillos.
- Week 9
- We consulted an engineer to get an appropriate design for the portón. "Maestro" X took a day off due to light drizzle early morning.
- Week 10
- The storage room is now complete, but clearly of a poor standard. There are further errors in the fachada, and the grossly inappropriate spacing of castillos is now very obvious throughout.
- Week 11
- There are further errors in not fixing the small marquesina immediately above the doorframe (we had to change the design), and a total mess in the preliminary efforts to make the columns (requiring another change of design). And "maestro" X has started to work half-time on a neighboring property, making progress even slower. But the good news is that the maestro who built "El Refugio" is available!
- Week 12
- Further very poor work on the columns and the small marquesina. We tell "maestro" X that the next week will be his last with us.
- Week 13
- Our first sight of construction of the large marquesina (which later failed due to insufficient/poor concrete). There is a further problem in the fachada by the storage room, although this is now irrelevant.
- Postmortem
- Perhaps the most important take-away is to get rid of someone like "maestro" X at the first sign of incompetence (and there were many). And what you can see is likely to be only the tip of the iceberg.
- This page is best viewed with a mouse and full-size screen.
04 Mar 2014 |
Part of the excavation for the boundary wall; the trenches are 1.8 meters deep. I am worried that we still have organic soil even at this depth (unlike at "El Refugio" where there is a firm mineral layer 1.3m down). I wondered whether we should have done a soil survey. However, I am assured that the soil is sufficiently compacted at this depth to give a good foundation. The house is to have its own wall, with a path about 1.2m wide between this and the boundary wall. It seemed more efficient to do the excavation for both boundary and house walls at the same time... |
04 Mar 2014 |
"Maestro" X chalked up a 4m x 4m square for his idea of a septic tank - a single chamber with unknown provision for venting, etc. Although he claimed to be able to do all the plumbing and electrical installations, he clearly did not know the first thing about septic tanks. The output from a single-chamber tank would in any case be very dirty and require a leach field over a sizeable area to break it down in the soil. The only acceptable solution here is a 4-chamber one like we have in "El Refugio" to cleanse and filter the water such that the output is agua gris that can be recycled (e.g. for irrigation). And it was worrying that he seemed to think that the entry to the tank would be from the street side, not from where he knew the house was to be built... I was also concerned to be advised that the aljibe should be in an inconspicuous area close to the house to be less ugly. It seems he was thinking of extracting water for the house using an irrigation pump, with one hose dangling in the water and the other hose going over the wall into the tinaco on the roof. Not the kind of installation I would want... Although "maestro" X considered it unnecessary, I already (today) hired Jaime to do the plumbing and electrical installations, and he will guide us in building a proper septic tank. We will of course have the same arrangement for extraction of water from the aljibe as that used for the well in "El Refugio" (submersible pump with automatic control system) - and naturally all piping will be embedded within the walls/floors. The aljibe will be located away from the house underneath the entertainment area, so as to not interfere with the house foundation. |
04 Mar 2014 |
Start of construction - some materials and an albañil sawing varilla for the castillos. |
04 Mar 2014 |
This shows the full 50cm extent of the rock foundation of the wall to the right. It was judged safer to do only a partial excavation for the moment to this side - the remainder of the excavation here would be done by hand. |
06 Mar 2014 |
More materials. There is a water supply and we have bought a 1100L tinaco to store water for mixing concrete. |
06 Mar 2014 |
The foundation is a traditional rock and concrete one; here are some of the castillos. At the foot of each should be a zapata with a plantilla underneath. This in fact is a second-best type of foundation, done by someone who knows no better; although cheaper than a reinforced concrete foundation, it is not in general a good choice, and especially not in this organic soil. I note that the castillos are around 4m apart - wider than the usual (and in Mexico regulatory) 3m; I am a little concerned about this, but it is already something of a fait accompli. We did not think it necessary to tell him how to build the wall, and we cannot visit more than about twice a week. It only became apparent some time later that he did not even bother to measure the distances between the castillos; the spans in fact vary considerably throughout the boundary wall. |
08 Mar 2014 |
The top of the rock section of the foundation. Above this will be a foundation wall of concrete block (tabicón) and a dala de desplante; the visible part of the wall will sit on this and also be of tabicón. We gave "maestro" X a simple drawing (as shown on the previous page and here) of the design of the fachada, with measurements showing clearly the position of the portón and the columns to the sides. This also contained details of how the castillos and dalas were to be enclosed (he seemed to take a considerable time to understand this simple construction). In any case, he clearly paid little attention to this drawing, since he later asked basic questions including "how wide do you want the portón?" that the drawing clearly showed. I found this pretty irritating, and made plain that if he could not or would not work from plans, there was no way he could build the house. |
14 Mar 2014 |
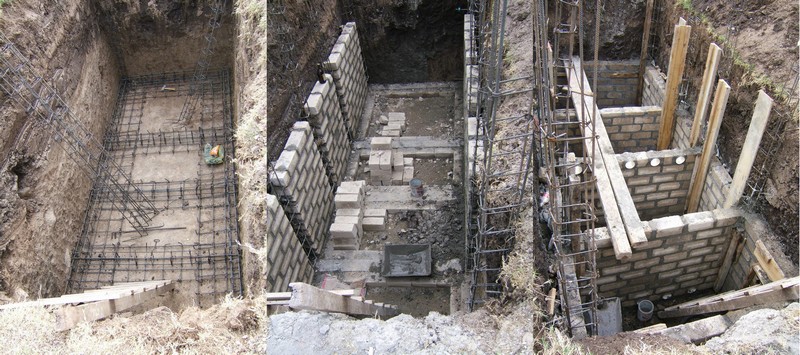
The excavation for the septic tank, which will have 4 chambers and be 4m x 2m; the storage room will go on top of this. To make clear how the septic tank was to be constructed (especially arrangement of internal pipes and reinforcements), in addition to verbal explanation we gave "maestro" X large hardcopies of three photos of construction of the septic tank in "El Refugio", that you can see here. We hoped that at least he would look at and understand these... |
17 Mar 2014 |
Excavation and construction have started by the boundary wall. |
22 Mar 2014 |
More foundation in the area of the septic tank. But I am now more concerned about the spacing of the castillos - mainly about 4m, here it is 5m to match the size of the storage room. Either he is not familiar with basic building principles (which is inconceivable, since everywhere one sees walls with castillos 3m apart), or else thinks he knows better. We also note that he does not use mortar for the walls, but a mixture of cement and lime. This is costing us dear in materials, since cement is more expensive than mortar; especially since he uses excessive quantities of it. Everybody else we have seen uses mortar. Again, "maestro" X knows better... |
22 Mar 2014 |
The foundation walls of the fachada with the castillos in place. At this point, I noticed that the distance between the castillos either side of the portón was visually clearly less than the 4m width of the doors. Measurement confirmed that it was indeed short by around half a meter. It is unbelievable that he paid no attention to about the only thing he had to think about in this simple work. It was remedied (hopefully without serious consequences) by bending the castillos either side to increase the width. After this there remained serious deviations in the positioning of the portón and the castillos. I later changed the drawing of the fachada to match the new "design". But not only has he made the portón too narrow and in the wrong place, he has ignored the fact that we want 50cm-wide round columns either side. These should have larger reinforcements with a circular cross-section; instead, the same castillos have been used as elsewhere. He has not taken a blind bit of notice of our requirements, and clearly has not given any thought whatever as to how the columns will be fitted. |
22 Mar 2014 |
A view of the back corner showing one of the numerous cracks in the neighbor's wall. |
27 Mar 2014 |
The tops of castillos at the back corner with reinforcements for the dala de desplante laid on top of the tabicón. I have to ask myself why the reinforcements for the castillos were made only for the foundation, and it will be necessary to cut and tie additional lengths for the wall above. The varilla comes in 12m lengths, which when cut in half (6m) would just nicely cover the depth of the foundation (1.8m) plus the height of the wall (4m). One should use single lengths of varilla as far as possible for structural reasons as well as to simplify the work; elsewhere we have always seen castillos made in accordance with these criteria. But "maestro" X knows best... We asked "maestro" X about tying the boundary wall foundation to that of the house as mentioned by the engineer, but he said it wasn't necessary. We later found that this applies to anything he knows nothing about, or otherwise can't or won't do... |
29 Mar 2014 |
The area by the septic tank showing some of the dalas filled in with concrete. |
29 Mar 2014 |
A finished section with dala from the back. There is revuelto for filling in around the completed foundations. But why? - it will be necessary to excavate here in the area toward the back for the house foundation. And filtro is a more appropriate material, as well as being much cheaper in this area... |
02 Apr 2014 |
The septic tank under construction. We are astonished to see that despite having given him photos that show clearly one set of tubes near the top and the other two near the bottom (and also explained this verbally), he has put two sets at the top and one set near the bottom. It is pretty simple stuff, especially since the tank structure is symmetrical, so it doesn't matter which way round he thought it was. We haven't managed to get to the site for a few days so this is the first we have seen of the septic tank. As such, we don't know what was done for the base (but the photos we gave him clearly showed how it was to be reinforced). |
05 Apr 2014 |
The problems with the tubes in the septic tank have now been remedied and it is being covered with aplanado. Jaime gives it the all-clear. |
09 Apr 2006 |
At the left is the start of construction of the walls. Before the walls are built, black sealant (Thermotek impermeabilizante on a strip of asphalt) is placed on the dala de desplante as a damp-proof course. If our fontanero Jaime hadn't pointed out the lack of this, it would have been omitted (again, "maestro" X apparently didn't consider it necessary). |
09 Apr 2014 |
Above the septic tank, construction of the storage room has started. With all the basic problems there have been, we didn't notice others clearly visible in this photo:
|
11 Apr 2014 |
Building materials for the "fachada sin acabado" including red adoquín for covering the dalas and yellow tabicón for covering the castillos. Inside the storage room can be seen the four service hatches (under covers) - these will make the task of raising the floor level more difficult. The storage room is 3m wide, leaving another unacceptable 5m gap between castillos to the right. This despite the fact that he left a section to the right (for the portón) too narrow at around 3.5m, not the 4m we required for the doors. |
11 Apr 2014 |
Enclosing the dalas and castillos should have been a no-brainer, but although I provided detailed drawings showing the construction as well as verbal explanation, it took a considerable length of time before "maestro" X showed the remotest understanding. To the right of the photo can be seen a mock-up we used to show him how to enclose the dalas. |
12 Apr 2014 |
The back corner by the neighbor's wall, showing the various levels of the foundation. |
12 Apr 2014 |
The fachada being built, showing the first efforts at the sandwich construction. Due to a mindless miscalculation, there is a large gap between the top piece of adoquín and that beneath, leading to ugly wide mortar layers. "Maestro" X blamed Y for this, which was clearly unfair, since "maestro" X should have done this more "demanding" work himself; in any case he is supposed to be responsible for the work. And I am certain that "maestro" X was doing the work on the fachada, and the miscalculation was purely his. Also, the top of the tabicón around the castillos must be aligned with the top surface of the adoquín to provide alignment in subsequent courses of tabicón. As can be seen, it is way out, with the level of the adoquín being well above that of the tabicón. It is hard to believe there are all these problems, with detailed scale drawings based on measurements of the material having been made, as well as numerous verbal instructions for this simple construction. |
12 Apr 2014 |
Y is doing the less "demanding" work building the left wall. |
17 Apr 2014 |
|
17 Apr 2014 |
Another overview of the construction, from the rear. Two peones will be hired to dig by hand the trench for the wall here by the neighbor's property. |
17 Apr 2014 |
Jaime has done more work here, including fitting the mangueras for electrical fittings in the storage room, and the casing for the electricity meter. |
17 Apr 2014 |
Inside one of the chambers of the septic tank. This is currently being used to hold water for construction. |
17 Apr 2014 |
A view from inside the storage room, with fittings for light and power. |
17 Apr 2014 |
The misalignment previously noted has been solved by using tabicón 10cm high rather than the normal 11cm (luckily it is available in these two heights). But it is the wrong color (yellow) - the design calls for yellow diamonds inside areas of gray. Another serious degradation to the design. |
23 Apr 2014 |
A castillo by the neighbor's wall with a zapata. The footing for this wall will be rather wider than that of the other walls, to make it more robust to any collapse of the neighbor's wall. But it will not give the same stability as zapatas corridas in a reinforced concrete foundation, which maestro" X obviously knows nothing about. And as we later found, this larger zapata is still way inadequate with a 4m-high wall in this type of soil; worse still, he did not bother to make proper plantillas. |
23 Apr 2014 |
"Maestro" X to date has ordered no fewer than 16 truckloads of revuelto, most of which has been placed in this area toward the back. Seemed strange, since he should have known that the house was to be built here and would require more excavation. In everything he does, he shows not the slightest propensity to think ahead - another example of this is the piecemeal way in which he orders basic materials such as cement and rebar. Maybe that was why he found it funny that I had produced plans... |
23 Apr 2014 |
|
23 Apr 2014 |
The fachada is now taking shape. We are not impressed. Apart from the unwanted yellow course of tabicón and the ugly wide mortar layers in the adoquín, the mortarwork is generally grossly overthick and uneven - this despite making it clear to him that we wanted well-finished work and it being priced accordingly. The material too is not as good as I had hoped, but the main problem is in the ungainly workmanship. |
26 Apr 2014 |
Construction of the foundation by the dodgy neighbor's wall. Of necessity, the wall must curve inwards slightly around here, due to the incursion by the reinforcing columns. |
26 Apr 2014 |
More work on the fachada. The already ugly scene is made still uglier by the use of a different colored "mortar" (gray not white) in the upper courses to the right side. |
29 Apr 2014 |
A view of the front with the losa of the storage room apparently in place. Today, we gave "maestro" X the pay-off of 2000 pesos that he requested for Y (who left last Saturday). We later found that Y never received this money - it seems that "maestro" X decided to keep it for himself... |
30 Apr 2014 |
A view from the side showing the roof of the storage room and walls. |
03 May 2014 |
These cracks in the wall result from a M7.2 earthquake over two weeks ago (18 April 2014). As far as I am aware, this caused not the slightest structural damage elsewhere in this area. Nonetheless, there is extensive cracking in the mortar in this storage room wall, and one piece of tabicón is also cracked. "Maestro" X claimed that this was due to the dala not having yet been laid, but this is patently untrue; photos dated 17 April (see above) show this dala in place. However, the castillo in the corner was not in place, which likely explained the damage, especially given the unacceptable 5m distance to the adjoining castillo (which had been completed). Still, as we found later, it doesn't take an earthquake to produce cracks and other issues in his walls... |
03 May 2014 |
The reinforcements for the dala de desplante for the wall by the neighbor. |
03 May 2014 |
The outside of the wall by the storage room; the crack in the tabicón is in the third course down at the edge (the two curved dark lines are steel wire). The meter will go in the hole to the right (we have no power as yet). |
03 May 2014 |
A general view from outside. Jaime has installed some of the conduits for exterior lighting. But it seems that "maestro" X is not cooperating with him, and Jaime's work is being disrupted through "maestro" X's work not having been completed in a timely and competent manner. |
05 May 2014 |
More on the fachada; the "sandwich" is now uncovered. Jaime has installed conduits and a switch in what will be a round column to the left. In the opening to the left will be the portón with heavy steel doors, round columns either side and a hopefully sound beam above (from which the doors will be suspended). Notwithstanding his assertions, it was clear that "maestro" X had no proper idea how to construct this, so we needed a design. I thought we should use an I-beam or two here, and we consulted the structural engineer about this. He told us where we could see an example, but the beams were exposed and the appearance not to our taste. In any case, we doubted "maestro" X was competent to weld beams. We returned and the engineer gave us a design using a trabe of varilla and concrete that should be within the scope of any albañil to build (even "maestro" X ?). |
05 May 2014 |
More on the right-hand wall; the slight bend is visible at this angle. |
08 May 2014 |
We had some rain last night, and there was still some light drizzle early morning, although this had stopped by mid morning. But this was sufficient to prevent "maestro" X from working as, blaming the weather, he didn't show up at all today (the fresh tracks are from deliveries of sand and gravel made in his absence). We are troubled by this poor work ethic. The rainy season is impending, and if this is anything to go by, the work (already progressing very slowly) will soon grind to a halt. In contrast, the people who built "El Refugio" (apart from being generally vastly more productive and competent than "maestro" X) continued to work in all but the heaviest rain, and consequently lost very little time. |
08 May 2014 |
We are relieved to see that at least they did seal these walls. |
08 May 2014 |
|
08 May 2014 |
14 May 2014 |
The storage room is now complete with door and window. A rather basic design, but we hope to improve it with appropriate finishing. We thought that it made more sense for this utilitarian construction to have small individual panes in the windows, rather than large ones that would be less resistant. But the work is of poor quality, with considerable unevenness in the losa, and a large gap over the window. The door has a much larger gap underneath (although this will actually be a blessing when it comes to raising the level of the floor to above that of the path). It has also not been finished to the standard we required (again it was to be left without acabado), and "maestro" X has neglected to make proper provision for drainage of the roof. One also notes that "maestro" X isn't too good at estimating materials requirements - although an accurate estimate should have been easy for this simple structure, he ordered at least twice the number of bricks required (which at that time were going to be needed only for this building). |
14 May 2014 |
Work around the area of the small door (looks pretty dodgy to me), and more wall built to the right-hand side. The small diamond pattern to the right of the door is in the wrong place - it is built 3 courses up as in the large diamonds to the left, but the drawing clearly shows it centered at 5 courses up; another basic mistake which will look bad. Although it is becoming clear that the fachada will have to be covered over, we tell him to remedy this error (one must never let mistakes go uncorrected). |
14 May 2014 |
An overview of the site. It is now very clear looking at the back wall that the sections of wall between the castillos (on average an excessive 4m in size) are decidedly unequal - thus not only has he used an unacceptably small number of castillos, but he couldn't even be bothered to measure equal distances between them (the 20m wall divides exactly into 5 spans of 4 meters). The same is true of the other walls, as well as the complete mess he made of the fachada (where no attempt whatever was made to measure the width or the position of the portón). |
14 May 2014 |
|
16 May 2014 |
A side view of the fachada. "Maestro" X has ignored our requirement for the small marquesina to be fixed immediately above the doorframe - see 24 May 2014. |
17 May 2014 |
Reinforcements for the dala are being laid, and Jaime has installed more conduits for external lighting. |
24 May 2014 |
We made clear to "maestro" X (not only in the drawing, but in discussions on more than one occasion) that the small marquesina was to be fixed immediately above the door. Nonetheless he continued to build the wall up to the level of the dala. It is not acceptable to me to have the thing stuck way above the doorframe, and so (given the failure of "maestro" X to follow instructions) I changed to this approach with the losa hanging downwards from the dala above. Since we are not putting lighting in this doorway, this new "design" is quite acceptable; but I am also quite clear that he had no intention of doing as instructed, since he could not be bothered to make the necessary header. And the quality of work is to his usual low standard, with noticeable unevenness and irregularities - we only hope that this can be remedied by finishing work. It is also quite clear that "maestro" X has no proper idea how to build the columns. He was going to fit them centered on the wall with a diameter of 30cm; this would have left major gaps between them and the adjoining walls. Again I have to specify that they must be placed forward of the wall, and be 40cm in diameter; this way they should completely cover the wall and in any case look better. Some extra reinforcement is required to the front of the castillos. (They were supposed to be 50cm diameter, but this was made impossible through his errors in positioning, as well as failing to make proper reinforcements). I produce a drawing based on accurate measurements I made of the current result (although it has become clear that giving him drawings is a waste of time). Work had previously been going very slowly, but got even slower when "maestro" X decided to work half-time on a neighboring property; he was then continually alternating between working on this property and on ours. This despite the fact that we had a considerable amount of work to do here. We always treated them well (always paid in full and promptly, gave them beverages and snacks, had been considerably more indulgent than we should have been) but we have not had good treatment in return. |
28 May 2014 |
The herrero is here to weld points to which the portón will be fixed onto the varilla. Later the concrete for the columns will be poured. There is now some extra reinforcement for the front of the column (only a piece of varilla with estribo, but we hope this will be sufficient). |
28 May 2014 |
A view from outside showing the marquesina. |
31 May 2014 |
More work on the walls. Jaime is to the right installing more conduits for the lighting. He is urging us to get rid of "maestro" X. |
31 May 2014 |
The columns have now been poured with concrete with granito and hammered, but again the work is unacceptable. There are some unsightly unredeemable areas on the right column, and the hammered finish is poor (it appears to have been done quickly with a standard hammer rather than the fine-tipped one that should be employed). The side fittings for the portón will be welded to the three metal squares, and of course we have serious concerns about whether the doors will hang properly (or at all...) |
31 May 2014 |
A view from the rear. Jaime is installing the light fittings in the columns. This evening, Verónica calls "maestro" X to tell him that next Saturday will be his last pay day with us. The last few weeks have not been easy, especially for Verónica who has had the job of attempting to get through to him (as she speaks rather better Spanish than I), and we have both been very preoccupied and stressed-out with all the problems. So although terminating him was not easy for her (especially considering the connection with her friend), it is a great relief for both of us to see the end of this nightmare. She actually told him that I had run out of money - I would have said (amongst other things) that he couldn't build a sand castle without it being a total disaster, and we would do better to give the plans to a chimpanzee... |
03 Jun 2014 |
This is our first sight of construction of the large marquesina. From this and the columns will hang the four doors of the portón. The small door to the side (2m x 1m) weighs in at 70Kg, so we suspect that with four doors of 3m x 1m around 400Kg will be hanging from the trabe and columns. Considering the quality of work and number of errors to date, we are afraid... |
03 Jun 2014 |
A view underneath the portón - "maestro" X showed a cellphone camera picture of reinforcements in the losa of the marquesina, but we have no way of knowing whether the all-important trabe over the portón has been made properly. He said it was made with eight 1/2" varillas - more than that recommended by the engineer, and which he said would give extra strength. This later failed - see here. |
03 Jun 2014 |
Another view of the fachada. This shows yet another problem - that the losa of the storage room is occupying the space where there should be tabicón, without even space to stick a slice of the material over it. There are also holes in the yellow tabicón over the castillos, presumably from knocking supports into the wall. But the final nail in the "fachada sin acabado" coffin had already been driven home. We have been considering ways to cover this unsightly mess (except for the adoquín, which we hope to redeem, although we still have the issue of the ugly thick mortar layers). |
Postmortem
After over three months since the start of construction, a large proportion of the work in this phase remains, and there is a profusion of problems in the work that has been done (more of these will transpire over the following months). Progress was always painfully slow, and made even slower over two weeks ago when "maestro" X decided to work on another property. But what has been even more painful is the realization bit by bit that he could do nothing properly, never mind well. His work has been costly, both in wasting a considerable amount in time and materials, and in the numerous defects that we will have to remedy. It is astounding that someone so incapable can have such a presumptuous know-it-all attitude; he obviously inhabits his own little world in which he has all the right and virtue, and everybody else is wrong. He also did not cooperate well with others, and his arrogant nature clearly rubbed people up the wrong way. Furthermore, he was dishonest in keeping the pay-off meant for Y, as well as in lying and blaming Y to cover up his incompetence. It is too bad that our decent and competent friend (who we know would have done vastly better work of the boundary wall) had to work under "maestro" X.
This sorry saga illustrates the importance of hiring the right people - one can't get bad people to do good work. And there is a considerable difference between the good and the bad people here (as you will see in comparing this page and the remainder). To avoid having to deal with another "maestro" X, one should consider the following points:
- Don't hire a jack of all trades - "maestro" X proved to be not just master of none, but adequate in none. There are plenty of skills required in albañilería, and no responsible maestro would think it appropriate for him to work in other areas such as electrical and plumbing installations.
- Don't hire someone on the basis of their assertions; confidence and competence are two different things. And the hallmark of the true ineptitude that "maestro" X exhibits is the inability to see one's own weaknesses and the strengths of others.
- Anyone who can call himself maestro will read and work from plans (and certainly not react to them like "maestro" X).
- If you do hire someone who is not up to standard, get rid of him as soon as possible - don't optimistically hope that it will all work out OK.
- Be aware that an acquaintance will only be more difficult to get rid of; find someone with a good reputation who can show you evidence of their work.
- It is well worthwhile to wait to find someone reputable - the best people not only do much better work, but will also be able to do it much more quickly (as you will see from the following pages).
Regarding planning the construction, if (as in this case) the house and boundary wall are separate but close together, they should be treated as a singe construction with a unified foundation. Although this may make it necessary to wait until the complete house plans are ready, again it is worth the wait.
But you've seen enough of the bad and the ugly - now let's take a look at the good. We are about to start a new chapter with our new real maestro Rubén. He had already looked over the plans, and he was not happy with the engineer's modifications. He felt that the castillos in the foundation plan were now too thin. In the roof plan, he agreed with me that the huge beams over the double-sloped roofs were grossly excessive, and would only transfer more load to the walls; apart from this, they were not consistent with my requirements. We agreed changes to the foundation plan as completed/modified by the engineer, and I edited it and made copies accordingly. For the other plans, we would use the originals.